Page 1 of 2
Endplates: Welded? Machined? Bolted together?
Posted: Wed Feb 15, 2017 7:46 pm
by sleepingdog
What are your guys' thoughts on the construction of end plates? I watched a video of Ed Fulawka making end plates and see he has his welded up from individual pieces. I've also seen some on this forum that have milled theirs from solid alumin(i)um. Others I have seen are individual pieces bolted together. I'm leaning towards milling mine primarily because aluminum welding around here is expensive to get done and would probably cost me as much as the solid aluminum, and I don't like the bolted together approach - I want it clean looking from the outside.
Thoughts?
Dave
Re: Endplates: Welded? Machined? Bolted together?
Posted: Thu Feb 16, 2017 7:35 pm
by Storm Rosson
I prefer single piece milled and since you have a mill ...what's the hold up Dave?

Re: Endplates: Welded? Machined? Bolted together?
Posted: Thu Feb 16, 2017 8:16 pm
by sleepingdog

Just needed some words of encouragement, Stormy

Thinking of something like this for the changer end. Is there any issue with the width of the top of the cabinet changing and causing problems as humidity levels change? I know wood can expand and contract more than one would imagine. I have a "slot" that the cabinet would fit into so that it can be attached from the inside and not require any fasteners to be visible from the outside, but it would restrict the top from being able to expand and contract. I'd hate to get a split in the top. Overthinking this?
Re: Endplates: Welded? Machined? Bolted together?
Posted: Fri Feb 17, 2017 10:50 am
by sleepingdog
How far in should the fingers be from the end of the guitar? In other words, how deep is the recess in the end of the guitar? I don't want the nylon tuning nuts to stick out too far, nor do I want them to be too far in such that it makes it hard to get to them and also makes the guitar longer. Does about an inch sound reasonable?
Re: Endplates: Welded? Machined? Bolted together?
Posted: Fri Feb 17, 2017 12:20 pm
by Storm Rosson
Mine were milled by a friend in CA. ie; Dale Tinney of Tinney enterprises so I was aable to converse during the milling so the original cast ones from a Super Pro were 3/4"mounting ledge/changer finger window, but I asked dale to extend the attachment lip where they screw to the body and the changer hole to 1"depth also, for better body attachment and a bit more depth at the tuner window. It's not a critical thing just like to keep the nylon tuning nuts tucked in a little. Since the top and bottom ledge's of the changer window are also the stop plates , it worked out well cause the top finger stop is 1/4" less deep than the bottom to keep the fingers vertically aligned and also gives me 1/4" of extra wood at an area notorious for developing cracks in body. IMO this dimension is at your discretion, just make sure the fingers hang like you designed em and keep in mind where the finger stop has to be for proper leverage (the ShoBud fingers are a two rivet design and require two stops) yours, I have already forgot whether u have 1 0r 2 pivot rivets, so take that into account as to stop positioning. It's not a must to use the endplate /changer window ledge as a stop you can mount that where it will perform best and fasten to the window/mounting ledge. The other positioning ,of the changer housing and and neck as to right /left placement is determined by the changer window placement just be mindful of the under side and that you give yourself adequate (wtf did I spell) room for the mechanics esp on the front apron to string #1 pull rod and the pedal pull arm/bellcrank. Stormy

I just booted the pooter so this complete answer may be unintelligable.....DOH.
Oh yeah don't forget to take the complete length of the body and all longitudinal things like changer housing, neck, and tuning head mount properly(looks kinda shitty if the tuning head is hanging over the end) after establishing exactly where the changer mount/support housing will be placed.
Re: Endplates: Welded? Machined? Bolted together?
Posted: Fri Feb 17, 2017 11:22 pm
by George Price
Dale is the best
Re: Endplates: Welded? Machined? Bolted together?
Posted: Sat Feb 18, 2017 2:54 am
by Storm Rosson
hey george ,I take it you know Dale Tinney? I totally agree he is one very nice guy, killer machinist, just ask Gary Rittenberry, Fred Justice, and a few more builders that Dale does their machinning. In fact Fred and I used to work together in the m,id 70's in a club in Ruidoso he was a killer player way back then and as good as anyone these days and lots better than most. Oh and Fred turned me on to Dale to make a few parts for me of course they came out perfect.I was shocked when he told me the bill as he was way more than fair, he and his wife still send me a christmas card every year...fine folks right there......Stormy
Re: Endplates: Welded? Machined? Bolted together?
Posted: Tue Feb 21, 2017 9:48 am
by sleepingdog
Storm Rosson wrote:...just be mindful of the under side and that you give yourself adequate (wtf did I spell) room for the mechanics esp on the front apron to string #1 pull rod and the pedal pull arm/bellcrank
Stormy, I'm going to do an SD cabinet, so there should be lots of room on the player's side, but like you said, leaving enough space on the front side will be critical. How much space would you leave between the string 1 pull rod and the inside front surface of the cabinet?
Re: Endplates: Welded? Machined? Bolted together?
Posted: Wed Feb 22, 2017 11:18 am
by Storm Rosson
That's a hard one to answer with any real certainty, I have thouroughly stared your cad diagrams down (I won but my eye is permanantly stuck open) and I sure you will have plenty of room,

Re: Endplates: Welded? Machined? Bolted together?
Posted: Sat Apr 15, 2017 9:43 am
by Bent
Hi Your drawing is good. You should have the end plate machined out of a 2X4 piece of 6061 T6 aluminum. You can ut down on some unnecessary weight: The leg hole pieces, make them only slightly longer than what your thread depth requires. I think mine are about .800"
Then the area above the changer window, you can cut down on some bulk there. Also overall thickness. I think mine have too great a wall thickness at 1/4". Try 3/16. both on front face and outside wraps. Inside wraps can be 1/8" as well as the ledge that screws on to the underside of body
Hope this helps!
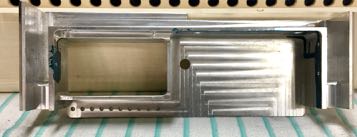
- IMG_2037.jpg (15.12 KiB) Viewed 3117 times